Tuesday, 11 June 2013

dialog boxes In BASH

dialog - display dialog boxes from shell scripts.

'dialog' is a utility for building console-based 'front ends' in UNIX like operating systems.
In this brief tutorial I am mentioning the usage of few important basic controls available with this 'dialog' utility and later I have created a very simple front end application in UNIX bash scripting using dialog.

note-

first install dialog rpm via YUM

#yum install dialog*  -y        {In REDHAT}

To install 'dialog' on your ubuntu:
# apt-get install dialog         {In Ubuntu}
 
 
 Example-1

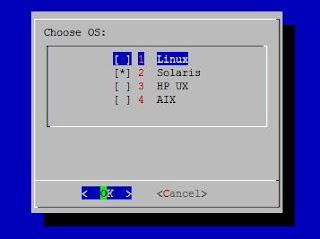
Checklist box:
A checklist box allows you to present a set of choices to the user 
and the user can toggle each one on or off individually using the space 
bar.
 
# dialog --checklist "Choose OS:" 15 40 5 1 Linux off 2 Solaris on 3 'HP UX' off 4 AIX off 


Radiolist box:

The 'radiolist' control box is same as 'checklist' box.


# dialog --backtitle "OS infomration" --radiolist "Select OS:" 10 40 3 1 "Linux 7.2" off 2 "Solaris 9" on 3 "HPUX 11i" off


Inputbox:

The 'inputbox' allows the user to enter a string.
# dialog --title "Inputbox - Example" --backtitle "KR Network Cloud" --inputbox "Enter your favourite OS here" 8 50


Menu box:
# dialog --title "A dialog Menu Example" --menu "Please choose an option:" 15 55 5 1 "Add a record to DB" 2 "Delete a record from DB" 3 "Exit from this menu"


message-box:
# dialog --title "Example Dialog message box" --msgbox "\n Installation Completed on host7" 6 50 


yesno box:
    
# dialog --title "Confirmation"  --yesno "Want to quit?" 6 20
 
 
Infobox:

# dialog --infobox "Processing, please wait" 3 34 ; sleep 5


TextBox: 
It is a simple file viewer
 # dialog --textbox ~/work/conf.txt 10 4
 

Gauge Box
#!/bin/sh
#A gauge Box example with dialog
(
c=10
while [ $c -ne 110 ]
    do
        echo $c
        echo "###"
        echo "$c %"
        echo "###"
        ((c+=10))
        sleep 1
done
) |
dialog --title "A Test Gauge With dialog" --gauge "Please wait ...." 10 60 0


Calendar Box:

#!/bin/sh

dat=$(dialog --stdout --title "My Calendar" \
                   --calendar "Select a date:" 0 0 25 12 2009)

case $? in
0)
 echo "You have entered: $dat"   ;;
1)
 echo "You have pressed Cancel"  ;;
255)
 echo "Box closed"   ;;
esac 


Time Box:

#!/bin/sh

tim=$(dialog --stdout --title "A TimeBox" \
                    --timebox "Set the time:" 0 0 10 13 59)

case $? in
0)
  echo "You have set: $tim"   ;;
1)
  echo "You have pressed Cancel"  ;;
255)
  echo "Box closed"   ;;
esac


Dear friends..
 
one of the great things about "dialog" is that there is also "xdialog".

xdialog works just like dialog except it uses X to create the same dialog boxes as dialog but in GUI form.

So,
 it is very easy to write a script that checks if X is running and then 
substitutes xdialog for dialog is it is true.  Making your program both 
terminal and X compatible. 
 

Shell Colors: colorizing shell scripts

Shell Colors: colorizing shell scripts


Shell scripts commonly used ANSI escape codes for color output.
Following table shows Numbers representing colors in Escape Sequences.

ColorForegroundBackground
Black 30 40
Red 31 41
Green 32 42
Yellow 33 43
Blue 34 44
Magenta 35 45
Cyan 36 46
White 37 47
 
Use the following template for writing colored text.

echo -e "\033[COLORm Sample text"

The "\033[" begins the escape sequence.You can also use "\e[" instead
of "\033[". COLOR specifies a foreground color, according to the table
above.The "m" terminates escape sequence, and text begins immediately
after that.
 
 
Note: With an echo, the -e option enables the escape sequences.You can
also use printf instead of echo. 
printf "\e[COLORm sample text\n"

To print Green text

echo -e "\033[32m Hello World"
             or
printf "\e[32m Hello World"

To return to the plain, normal mode, we have yet another sequence.

echo -e "\033[0m"
 

The following table summarizes numbers representing text attributes
in Escape Sequences.

ANSI CODEMeaning
0Normal Characters
1Bold Characters
4Underlined Characters
5Blinking Characters
7Reverse video Characters
Note: Blink attribute doesn't work in any terminal emulator, but it will work on the console.
echo -e "\033[COLOR1;COLOR2m sample text\033[0m"
 

There are some differences between colors when combining colors with
bold text attribute.

The following table summarises these differences.
Bold offcolorBold oncolor
0;30Balck1;30Dark Gray
0;31Red1;31Dark Red
0;32Green1;32Dark Green
0;33Brown1;33Yellow
0;34Blue1;34Dark Blue
0;35Magenta1;35Dark Magenta
0;36Cyan1;30Dark Cyan
0;37Light Gray1;30White


There are some differences between colors when combining colors with
bold text attribute.

The following table summarises these differences.
Bold offcolorBold oncolor
0;30Balck1;30Dark Gray
0;31Red1;31Dark Red
0;32Green1;32Dark Green
0;33Brown1;33Yellow
0;34Blue1;34Dark Blue
0;35Magenta1;35Dark Magenta
0;36Cyan1;30Dark Cyan
0;37Light Gray1;30White

The following shell script prints all the colors and codes on the
screen.
#!/bin/bash # This script echoes colors and codes echo -e "\n\033[4;31mLight Colors\033[0m \t\t\033[1;4;31mDark Colors\033[0m" echo -e "\e[0;30;47m Black \e[0m 0;30m \t\e[1;30;40m Dark Gray \e[0m 1;30m" echo -e "\e[0;31;47m Red \e[0m 0;31m \t\e[1;31;40m Dark Red \e[0m 1;31m" echo -e "\e[0;32;47m Green \e[0m 0;32m \t\e[1;32;40m Dark Green \e[0m 1;32m" echo -e "\e[0;33;47m Brown \e[0m 0;33m \t\e[1;33;40m Yellow \e[0m 1;33m" echo -e "\e[0;34;47m Blue \e[0m 0;34m \t\e[1;34;40m Dark Blue \e[0m 1;34m" echo -e "\e[0;35;47m Magenta \e[0m 0;35m \t\e[1;35;40m DarkMagenta\e[0m 1;35m" echo -e "\e[0;36;47m Cyan \e[0m 0;36m \t\e[1;36;40m Dark Cyan \e[0m 1;36m" echo -e "\e[0;37;47m LightGray\e[0m 0;37m \t\e[1;37;40m White \e[0m 1;37m"
OUTPUT:
Some examples:
Block background and white text echo -e "\033[40;37m Hello World\033[0m" Reverse video text attribute option interchanges fg and bg colors. Bellow statement prints block on white echo -e "\033[40;37;7m Hello World\033[0m" echo -e "\033[33;44m Yellow text on blue background\033[0m" echo -e "\033[1;33;44m Bold yellow text on blue background\033[0m"

YUM Server in linux

What is YUM ?
 
yum is an automated, interactive and cool update program which can be used for maintaining systems using rpm.
yum stands for : Yellowdog Updater Modified
The best reason to use yum is, yum installs all the required dependent rpms related to the installing package
yum have two type, yum client and yum repo server.
yum client as name suggests, it usually install on users local machine, on which user wants to install other packages.
And the yum repo server, is usually configured on remote server or we can use Red Hat repository server. yum server have set of all the repositories along with its dependencies. We just download from the server and install it on our local machine via yum client as and when needed.

Differences between Ext2,Ext3 and Ext4 file systems

Differences between Ext2,Ext3 and Ext4 file systems

it is always a question in our mind what are the basic difference between ext2, ext3 and ext4 filesystems.
So here is the answer for you,

(Note:-) ext2, ext3 and ext4 are all filesystems created for Linux. This article explains the following:

    * High level difference between these filesystems.
    * How to create these filesystems.
    * How to convert from one filesystem type to another.


Ext2

    * Ext2 stands for second extended file system.
    * It was introduced in 1993. Developed by Rémy Card.
    * This was developed to overcome the limitation of the original ext file system.
    * Ext2 does not have journaling feature.
    * On flash drives, usb drives, ext2 is recommended, as it doesn’t need to do the over head of journaling.
    * Maximum individual file size can be from 16 GB to 2 TB
    * Overall ext2 file system size can be from 2 TB to 32 TB


Ext3

    * Ext3 stands for third extended file system.
    * It was introduced in 2001. Developed by Stephen Tweedie.
    * Starting from Linux Kernel 2.4.15 ext3 was available.
    * The main benefit of ext3 is that it allows journaling.
    * Journaling has a dedicated area in the file system, where all the changes are tracked. When the system crashes, the possibility of file system corruption is less because of journaling.
    * Maximum individual file size can be from 16 GB to 2 TB
    * Overall ext3 file system size can be from 2 TB to 32 TB
    * There are three types of journaling available in ext3 file system.
          o Journal – Metadata and content are saved in the journal.
          o Ordered – Only metadata is saved in the journal. Metadata are journaled only after writing the content to disk. This is the default.
          o Writeback – Only metadata is saved in the journal. Metadata might be journaled either before or after the content is written to the disk.
    * You can convert a ext2 file system to ext3 file system directly (without backup/restore).

Ext4

    * Ext4 stands for fourth extended file system.
    * It was introduced in 2008.
    * Starting from Linux Kernel 2.6.19 ext4 was available.
    * Supports huge individual file size and overall file system size.
    * Maximum individual file size can be from 16 GB to 16 TB
    * Overall maximum ext4 file system size is 1 EB (exabyte). 1 EB = 1024 PB (petabyte). 1 PB = 1024 TB (terabyte).
    * Directory can contain a maximum of 64,000 subdirectories (as opposed to 32,000 in ext3)
    * You can also mount an existing ext3 fs as ext4 fs (without having to upgrade it).
    * Several other new features are introduced in ext4: multiblock allocation, delayed allocation, journal checksum. fast fsck, etc. All you need to know is that these new features have improved the performance and reliability of the filesystem when compared to ext3.
    * In ext4, you also have the option of turning the journaling feature “off”.


Warning: Don’t execute any of the commands given below, if you don’t know what you are doing. You will lose your data!

Creating an ext2, or ext3, or ext4 filesystem

Once you’ve partitioned your hard disk using fdisk command, use mke2fs to create either ext2, ext3, or ext4 file system.

Create an ext2 file system:
mke2fs /dev/sda1

Create an ext3 file system:
mkfs.ext3 /dev/sda1
(or)
mke2fs –j /dev/sda1

Create an ext4 file system:
mkfs.ext4 /dev/sda1
(or)
mke2fs -t ext4 /dev/sda1

Converting ext2 to ext3

For example, if you are upgrading /dev/sda2 that is mounted as /home, from ext2 to ext3, do the following.
umount /dev/sda2
tune2fs -j /dev/sda2
mount /dev/sda2 /home

Note: You really don’t need to umount and mount it, as ext2 to ext3 conversion can happen on a live file system. But, I feel better doing the conversion offline.

Converting ext3 to ext4

If you are upgrading /dev/sda2 that is mounted as /home, from ext3 to ext4, do the following.
umount /dev/sda2
tune2fs -O extents,uninit_bg,dir_index /dev/sda2
e2fsck -pf /dev/sda2
mount /dev/sda2 /home

Again, try all of the above commands only on a test system, where you can afford to lose all your data.


What is Journaling?

Journaling is only used when writing to a disk and it acts as a sort of punch clock for all writes. This fixes the problem of disk corruption when things are written to the hard drive and then the computer crashes or power is lost. Without a journal the operating system would have no way to know if the file was completely written to disk.
With a journal the file is first written to the journal, punch-in, and then the journal writes the file to disk when ready. Once it has successfully written to the disk, it is removed from the journal, punch-out, and the operation is complete. If power is lost while being written to disk the file system can check the journal for all operations that have not yet been completed and remember where it left off.
The biggest downside to journaling is that it sacrifices some performance in exchange for stability. There is more overhead to write a file to disk but file systems get around this overhead by not writing the full file to the journal. Instead only the file metadata, inode, or disk location is recorded before actually being written to disk.

Done.. 

AWK command part-11

gawk - Calculate date / time difference between timestamps


How to find the time difference between timestamps using gawk?
  Let us consider a file where the
        1st column is the Process name,
        2nd is the start time of the process, and
        3rd column is the end time of the process.

The requirement is to find the time consumed by the process which is the difference between the start and the end times.

1. File in which the date and time component are separated by a space:

$ cat file
P1,2012 12 4 21 36 48,2012 12 4 22 26 53
P2,2012 12 4 20 36 48,2012 12 4 21 21 23
P3,2012 12 4 18 36 48,2012 12 4 20 12 35

Time difference in seconds:

$ awk -F, '{d2=mktime($3);d1=mktime($2);print $1","d2-d1,"secs";}' file
P1,3005 secs
P2,2675 secs
P3,5747 secs

  Using mktime function, the Unix time is calculated for the date time strings, and their difference gives us the time elapsed in seconds.

2. File with the different date format :

$ cat file
P1,2012-12-4 21:36:48,2012-12-4 22:26:53
P2,2012-12-4 20:36:48,2012-12-4 21:21:23
P3,2012-12-4 18:36:48,2012-12-4 20:12:35

Note: This file has the start time and end time in different formats

Difference in seconds:

$ awk -F, '{gsub(/[-:]/," ",$2);gsub(/[-:]/," ",$3);d2=mktime($3);d1=mktime($2);print $1","d2-d1,"secs";}' file
P1,3005 secs
P2,2675 secs
P3,5747 secs

 Using gsub function, the '-' and ':' are replaced with a space. This is done because the mktime function arguments should be space separated.
Difference in minutes:

$ awk -F, '{gsub(/[-:]/," ",$2);gsub(/[-:]/," ",$3);d2=mktime($3);d1=mktime($2);print $1","(d2-d1)/60,"mins";}' file
P1,50.0833 mins
P2,44.5833 mins
P3,95.7833 mins

Just by dividing the seconds difference by 60 gives us the difference in minutes.

3. File with only date, without time part:

$ cat file
P1,2012-12-4,2012-12-6
P2,2012-12-4,2012-12-8
P3,2012-12-4,2012-12-5

Note: The start and end time has only the date components, no time components

Difference in seconds:

$ awk -F, '{gsub(/-/," ",$2);gsub(/-/," ",$3);$2=$2" 0 0 0";$3=$3" 0 0 0";d2=mktime($3);d1=mktime($2);print $1","d2-d1,"secs";}' file
P1,172800 secs
P2,345600 secs
P3,86400 secs

In addition to replacing the '-' and ':' with spaces, 0's are appended to the date field since the mktime requires the date in 6 column format.

Difference in days:

$ awk -F, '{gsub(/-/," ",$2);gsub(/-/," ",$3);$2=$2" 0 0 0";$3=$3" 0 0 0";d2=mktime($3);d1=mktime($2);print $1","(d2-d1)/86400,"days";}' file
P1,2 days
P2,4 days
P3,1 days

   A day has 86400(24*60*60) seconds, and hence by dividing the duration in seconds by 86400, the duration in days can be obtained.

AWK command part-10

gawk - Date and time calculation functions


gawk has 3 functions to calculate date and time:

    * systime
    * strftime
    * mktime

   Let us see in this article how to use these functions:

systime:
   This function is equivalent to the Unix date (date +%s) command. It gives the Unix time, total number of seconds elapsed since the epoch(01-01-1970 00:00:00).

$ echo | awk '{print systime();}'
1358146640

Note: systime function does not take any arguments.

strftime:
   A very common function used in gawk to format the systime into a calendar format. Using this function, from the systime, the year, month, date, hours, mins and seconds can be separated.

Syntax:
   strftime (<format specifiers>,unix time);
1. Printing current date time using strftime:

$ echo | awk '{print strftime("%d-%m-%y %H-%M-%S",systime());}'
14-01-13 12-37-45

   strftime takes format specifiers which are same as the format specifiers available with the date command. %d for date, %m for month number (1 to 12), %y for the 2 digit year number, %H for the hour in 24 hour format, %M for minutes and %S for seconds. In this way, strftime converts Unix time into a date string.

2. Display current date time using strftime without systime:

$ echo | awk '{print strftime("%d-%m-%y %H-%M-%S");}'
14-01-13 12-38-08

   Both the arguments of strftime are optional. When the timestamp is not provided, it takes the systime by default.

3. strftime with no arguments:

$ echo | awk '{print strftime();}'
Mon Jan 14 12:30:05 IST 2013

  strftime without the format specifiers provides the output in the default output format as the Unix date command.

mktime:
    mktime function converts any given date time string into a Unix time, which is of the systime format.
Syntax:
  mktime(date time string) # where date time string is a string which contains atleast 6 components in the following order: YYYY MM DD HH MM SS

1. Printing timestamp for a specific date time :

$ echo | awk '{print mktime("2012 12 21 0 0 0");}'
1356028200

     This gives the Unix time for the date 21-Dec-12.

2.  Using strftime with mktime:

$ echo | awk '{print strftime("%d-%m-%Y",mktime("2012 12 21 0 0 0"));}'
21-12-2012

   The output of mktime can be validated by formatting the mktime output using the strftime function as above.

3. Negative date in mktime:

$ echo | awk '{print strftime("%d-%m-%Y",mktime("2012 12 -1 0 0 0"));}'
29-11-2012

  mktime can take negative values as well. -1 in the date position indicates one day before the date specified which in this case leads to 29th Nov 2012.

4. Negative hour value in mktime:

$ echo | awk '{print strftime("%d-%m-%Y %H-%M-%S",mktime("2012 12 3 -2 0 0"));}'
02-12-2012 22-00-00

    -2 in the hours position indicates 2 hours before the specified date time which in this case leads to "2-Dec-2012 22" hours.

AWK command part-9

awk -examples to insert / remove / update fields of a CSV file


How to manipulate a text / CSV file using awk/gawk? How to insert/add a column between columns, remove columns, or to update a particular column? Let us discuss in this article.

Consider a CSV file with the following contents:

$ cat file
Unix,10,A
Linux,30,B
Solaris,40,C
Fedora,20,D
Ubuntu,50,E

1. To insert a new column (say serial number) before the 1st column

$ awk -F, '{$1=++i FS $1;}1' OFS=, file
1,Unix,10,A
2,Linux,30,B
3,Solaris,40,C
4,Fedora,20,D
5,Ubuntu,50,E

$1=++i FS $1 => Space is used to concatenate columns in awk. This expression concatenates a new field(++i) with the 1st field along with the delimiter(FS), and assigns it back to the 1st field($1). FS contains the file delimiter.

2. To insert a new column after the last column

$ awk -F, '{$(NF+1)=++i;}1' OFS=, file
Unix,10,A,1
Linux,30,B,2
Solaris,40,C,3
Fedora,20,D,4
Ubuntu,50,E,5

$NF indicates the value of last column. Hence,by assigning something to $(NF+1), a new field is inserted at the end automatically.

3. Add 2 columns after the last column:

$ awk -F, '{$(NF+1)=++i FS "X";}1' OFS=, file
Unix,10,A,1,X
Linux,30,B,2,X
Solaris,40,C,3,X
Fedora,20,D,4,X
Ubuntu,50,E,5,X

The explanation gives for the above 2 examples holds good here.

4. To insert a column before the 2nd last column

$ awk -F, '{$(NF-1)=++i FS $(NF-1);}1' OFS=, file
Unix,1,10,A
Linux,2,30,B
Solaris,3,40,C
Fedora,4,20,D
Ubuntu,5,50,E

NF-1 points to the 2nd last column. Hence, by concatenating the serial number in the beginning of NF-1 ends up in inserting a column before the 2nd last.

5. Update 2nd column by adding 10 to the variable:

$ awk -F, '{$2+=10;}1' OFS=, file
Unix,20,A
Linux,40,B
Solaris,50,C
Fedora,30,D
Ubuntu,60,E

   $2 is incremented by 10.

6.Convert a specific column(1st column) to uppercase in the CSV file:

$ awk -F, '{$1=toupper($1)}1' OFS=, file
UNIX,10,A
LINUX,30,B
SOLARIS,40,C
FEDORA,20,D
UBUNTU,50,E

Using the toupper function of the awk, the 1st column is converted from lowercase to uppercase.

7. Extract only first 3 characters of a specific column(1st column):

$ awk -F, '{$1=substr($1,0,3)}1' OFS=, file
Uni,10,A
Lin,30,B
Sol,40,C
Fed,20,D
Ubu,50,E

Using the substr function of awk, a substring of only the first few characters can be retrieved.

8.Empty the value in the 2nd column:

$ awk -F, '{$2="";}1' OFS=, file
Unix,,A
Linux,,B
Solaris,,C
Fedora,,D
Ubuntu,,E

Set the variable of 2nd column($2) to blank(""). Now, when the line is printed, $2 will be blank.

9. Remove/Delete the 2nd column from the CSV file:

$ awk -F, '{for(i=1;i<=NF;i++)if(i!=x)f=f?f FS $i:$i;print f;f=""}' x=2 file
Unix,A
Linux,B
Solaris,C
Fedora,D
Ubuntu,E

By just emptying a particular column, the column stays as is with empty value. To remove a column, all the subsequent columns from that position, needs to be advanced one position ahead. The for loop loops on all the fields. Using the ternary operator, every column is concatenated to the variable  "f" provided it is not 2nd column using the FS as delimiter. At the end, the variable "f" is printed which contains the updated record. The column to be removed is passed through the awk variable "x" and hence just be setting the appropriate number in x, any specific column can be removed.

10. Join 3rd column with 2nd colmn using ':' and remove the 3rd column:

$ awk -F, '{$2=$2":"$x;for(i=1;i<=NF;i++)if(i!=x)f=f?f FS $i:$i;print f;f=""}' x=3 file
Unix,10:A
Linux,30:B
Solaris,40:C
Fedora,20:D
Ubuntu,50:E

Almost same as last example expcept that first the 3rd column($3) is concatenated with 2nd column($2) and then removed.